Parksville / Qualicum Beach's only Apple Certified Macintosh Technician (ACMT) and Apple Support Professional, Dan LaRocque, posts semi-regular tips and blogs about his day-to-day experiences with Macintosh computer technology, social media, web marketing & design and other technology related developments.
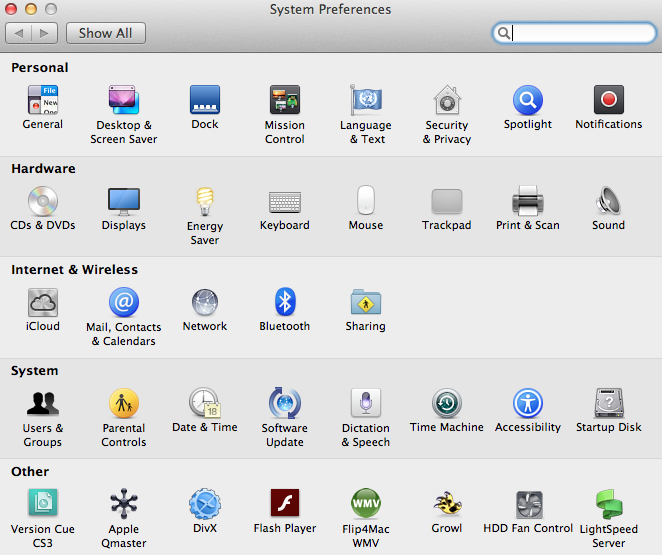 These are your Mac’s System Preferences. They can do a lot. So, as an exercise, I’m going to go through each of them, one a day, and show you what they do. For starters, you can find them in your Apple menu, very top left of your screen.
System Preferences #1 – General
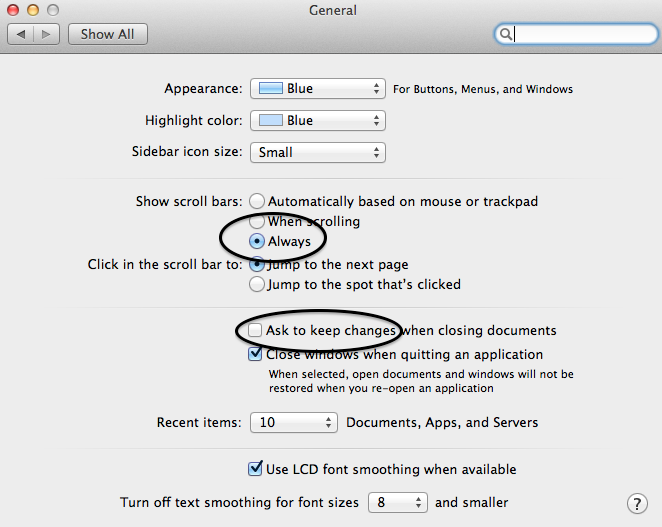 This one’s mostly about appearance, such as highlight colour and size of sidebar icons. My suggestion, as always, is to open it up and see what each option can do. You can’t ruin anything. The one that matters to me the most is the option for automatic scroll bars. After upgrading to a new OS, you may be dismayed that your scrollbars have disappeared due to the default, ‘automatically based on location’. First thing I do is switch that option to ‘always’. I just don’t like to hover in hopes that my scrollbars will appear. You ight also want to select, ‘ask to keep changes when closing a document’, too.
System Preferences #2 – Desktop and Screensaver
This is where you choose your desktop picture, whether it’s from Apple’s default folders or your own Photos library. You can choose to rotate through a selection of your photos on a schedule of seconds, minutes or days. If you don’t want your slideshow to include your entire Photos library, you can create an album of your top 10, 50 or 200 etc photos, and select it as your target folder.
There are screensaver options on the second page, though screensaver are not as crucial as they were when we used old cathode ray tube (CRT) monitors
How To Create An Apple ID, Quick Guide to Bits and Bytes, How To Change Your Wifi Network Password, How to create a monthly calendar item, How to set a specific ringtone, recent software updates
How To Create An Apple ID
Hard to believe, but there are people out there using Mac computers who have never created an Apple ID. Any computer post-Snow Leopard does require an Apple ID to be able to buy apps, rent movies, buy music and books, and take advantage of the benefits of iCloud.
The process is pretty straightforward. Navigate to https://appleid.apple.com/account and fill in all the details. The tricky part comes at the point where you have to answer a series of security questions. The problem is, you could potentially forget the answers to the questions 2 or 3 years down the road, or even tomorrow afternoon, if you’re like me. Best practice would be to take a screenshot of the answers by pressing command-shift-4 simultaneously and drawing the mouse coordinates over the answers. Store the screenshot on your desktop, or wherever else you can find it easily. You’ll also have to fill in your birthdate. Please don’t try to trick them into thinking you’re younger than you actually are. Don’t laugh, I’ve seen it happen. When, not if, you forget your Apple password, you will need these details to reset your password.
You don’t need to add your credit card info at this moment, you can choose ‘none’ as your payment method.
Create a good, strong password. Your Apple ID contains many important details about you, and you don’t want scammers getting access to those details. Refer to one of my older blog posts about how to create a strong password here. https://upyourmedia.macficient.com/…/13-passwords-and-security-for-…
You’ll have to verify your email address before the ID becomes active, just follow the link in the email Apple sends.
A Short Guide to Bits and Bytes
Your computer uses bits and bytes to process information. 1000 bytes is a Kilobyte. 1000 KB is a Megabyte. 1000 MB is a Gigabyte. 1000 GB is a terabyte. Your front facing iPhone camera takes pictures of about 150-300 KB, the rear-facing camera is closer to 3 MB. So if you have a 1 TB hard drive, you can cram in with about 333,000 selfies. Get snapping’!
How To Change Your Wifi Network Password
There are a few reasons why you might want to change your wifi password. I use the technique to get my unco-operative teenage son’s attention. To do so, log in to your modem via Safari by typing the modem’s IP address in to the address field. (Telus and Shaw addresses and passwords will be printed on the modem itself, for D-links etc, you may have to do a Google search for the address. It will look something like 192.168.0.1) Look for your wireless settings, change the SSID (network name) if you wish. CSIS Surveillance Van, or Click Here Mom are two good choices. Then change the password. Distribute the password at your discretion. Keep in mind that ALL of your devices will have to have the new password entered, including your wireless printer, iPhone, Apple TV, etc,
If your wifi is being served through an Apple Airport Extreme or Express, you can easily change your password through the Airport Utility.
How To Create A Recurring Calendar item in Calendars
You can create monthly recurring events in your Calendar app. (or weekly, bi-weekly, or even every 2nd Friday of the month). Easy, and handy for regular events, such as pre-authorized payments, book-club meetings etc. I use this one to keep track of my pet’s flea medications. Create the event as normal, but when you go to edit it, click the ‘repeat’ option in the data field. Choose the applicable option, daily, weekly, bi-weekly, monthly. Alternately, you can select Custom, which will allow you to set custom details, such as every six weeks, every 3rd Tuesday, etc. You can even choose to be alerted the day, hour or week before, to ensure that you’re prepared. Works!
How to Set an Individual Ringtone for a Specific Contact
I love my ringtones, and I love to be able to know who is calling or texting without even glancing at my phone. I’ve created many many ringtones that I assign to my favourite contacts, many of them that are fully in line with the personality of the contact, and I’m working on making them available on my website. There are 2 dozen stock ringtones already available to you on your iPhone, and to assign one to any contact, you need to navigate to your Contacts App, open the specific contact of your choosing, click edit, then change the ring or text tone from default to one of the other tones available. It really does make ignoring your phone a little easier, and can set yours apart from the other 15 iPhones in line at the bank.
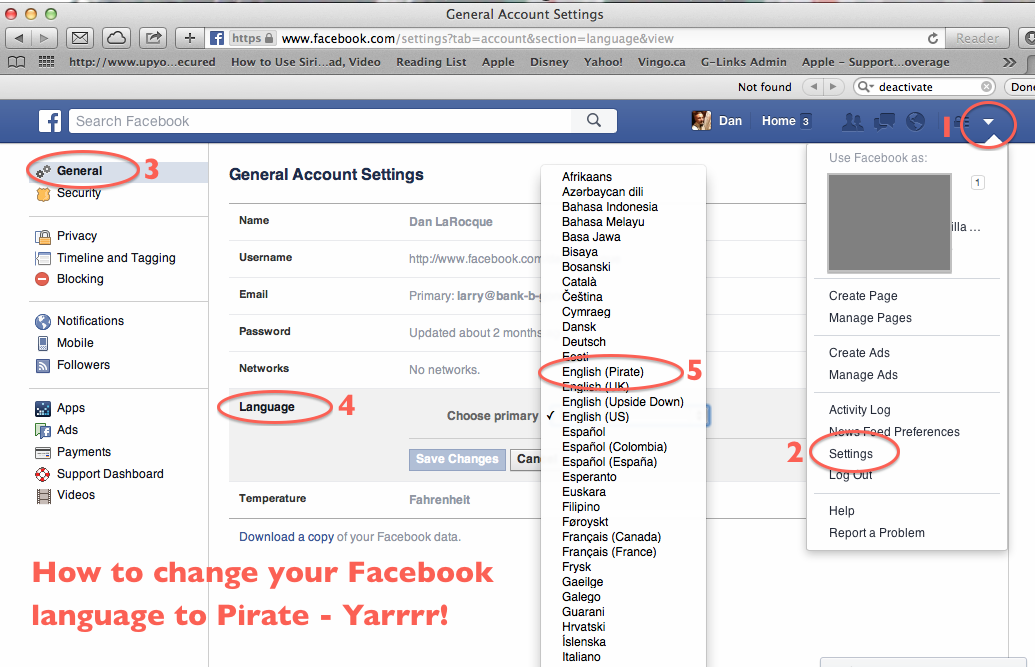
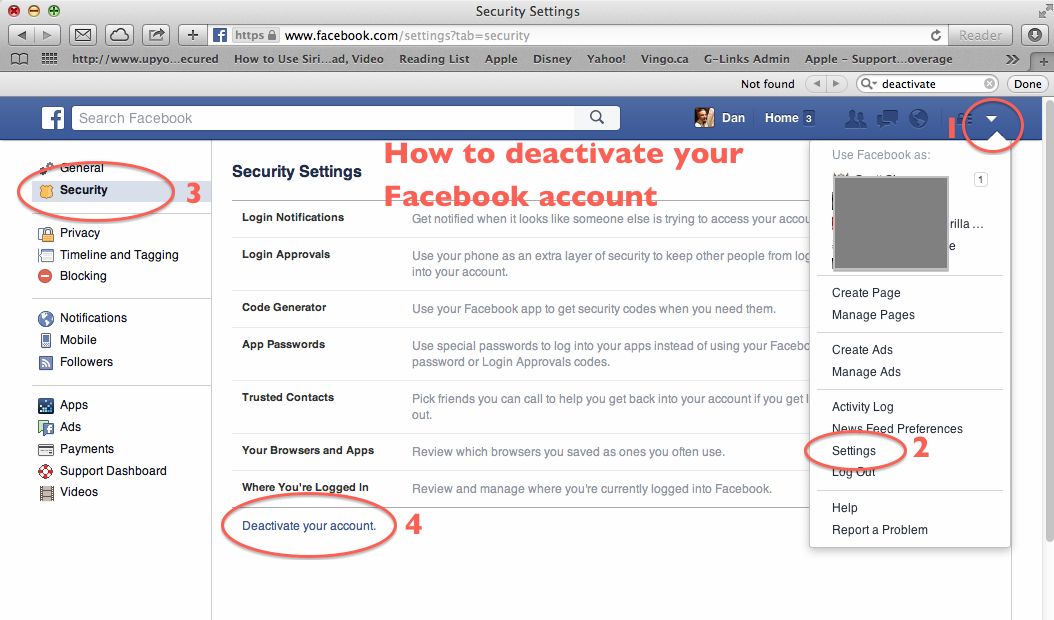
That was a pretty good “Intro to Facebook” workshop for about 40 PQMug members last night. Two things that came up were how to deactivate your account, and how to change your language to Pirate. For the latter, click the triangular drop down menu at your far right, go to settings, choose General, select language, and save. Yarrrr!
I’ve seen the same issue on 3 different MacBooks in the past week, a computer that basically ceases to function due to a completely filled hard drive. Your computer needs free space (aka headspace) to be able to ‘think’, room to place the data while it’s busy computing. The original MacBooks shipped with hard drives as small as 60 GB and up to 120 or 160 GB, which at the time was a fairly decent size considering the proportions of the files it was using. iTunes libraries have expanded, cameras have increased their pixel resolutions and people are downloading movies at a rampant pace, leading to the problem of lack of storage.
Luckily there’s no reason not to keep that computer on the info super-highway, and the fix is cheap and easy. There are two ways to mitigate this problem, either by upgrading the internal hard drive or by using an external drive to store your files. The former is my preferred method and a 500 GB internal drive can be yours in less than 24 hours and for a cost of around $225.00, complete with a restoration of your old data onto the new drive.
The latter is just as easy and can be as cheap as $100-$150 for a 500 GB or 1 TB drive. Make sure you format the drive using Disk Utility as Mac OS Extended, since your MacBook can communicate with the drive right out of the box, but you will likely have problems dragging larger files onto the drive if it’s formatted as MS DOS FAT. Drag your movie files and other large folders directly onto the drive and erase them off your internal disk to free up headspace. If you have a substantial iTunes library you can use the external drive as the source of your music files, same goes with iPhoto and your iMovie media files. You can continue to use the external drive as your Time Machine backup (also highly recommended).
Times are tight and most people don’t have the budget to buy a brand new computer every time their older machine fills up. This is quick, cheap and easy way to extend the life of your older machine.
Now that you’ve got an iPhone and / or iPad, your email app is sure to be one of your most important tools for staying connected with friends and family while out on the road, or on the beach.
The major cellular providers on the Island, Rogers and Telus, have some obscure and hard-to-find email setup instructions for Apple devices. Shaw, the dominant internet provider, also fails to give a coherent solution for sending and receiving emails while outside your home’s wireless network area. Even if you manage to input the correct credentials, the results are often inconsistent and generally frustrating.
In my experience, your best and simplest bet for email on your mobile device is to use a Gmail account, and filter your existing email through that account. You can continue to send mail using your regular address no matter where you are, whether at home, in a coffee shop, or lounging poolside. Gmail is secure, free, accessible anywhere, and backed by Google, one of the largest, most respected companies in the world.
Navigate to http://gmail.com and click the sign up button, then follow the simple steps to create a Google account. Your Google user name will become your Gmail address, ie., This email address is being protected from spambots. You need JavaScript enabled to view it..
Adding your new Gmail address to your mobile device is dirt-simple. Just type the address into your mail settings along with your password, and the device will add the rest of the settings automatically.
Once you’ve created the address, you can navigate to the Gmail settings menu to allow you to send email from your existing Shaw, Telus, or any other address. That option appears in the ‘Accounts and Import’ panel of your Gmail settings. Add your existing address in the ‘Send Mail As’ option in the list. You’ll have to then confirm your account via an email that Google will send you.
On the same settings page, you can also choose to use Gmail to check the messages from your other account, thus allowing you to keep just one email account on your device. Because Gmail uses the IMAP protocol, this will help sync your messages across all your applicable devices, ie., if you delete an email from your phone, that message will also be deleted from your iMac, your iPhone, and your iPad.
There may come a day when local service providers catch up with the technology their customers are using, but until then, Gmail will do just nicely, thank you.
It’s a common perception that Macintosh computers are immune to viruses and malware, but technically, that’s not quite true. Despite Apple’s more secure UNIX based operating system, any computer is susceptible to attacks from unscrupulous programmers. However, in 20 years of using Macs online on a daily professional basis, I’ve yet to hear first hand of any successful, debilitating mass attack. To this day, the only reason I have an antivirus software on my computer, is because I was asked by a client to test it. I check it every 2 weeks or so, with no reported attacks.
Email is another issue that can be problematic from a security standpoint, particularly webmail services, such as Hotmail, Yahoo and Gmail. Hotmail is probably one of the most hacked email services out there, and you’ve probably gotten emails in the past year from ‘friends’ whose accounts have been compromised, and who have unwittingly spammed their entire contacts list. Your best defense against such potentially harmful hacking is to change your password to something more secure, and change it again every few months.
When I say a more ‘secure’ password, that means that it should not be a common word, or string of numbers. According to the New York Times, the most common passwords out there are ‘12345’, followed (logically) by ‘123456’, and then, if you can believe it, ‘password’. And if you’re one of the 70% of people I meet whose password is the name of their pet, or their children, don’t worry, there’s help for you.
One trick I use when creating a new password is to substitute certain letters for numerals, ie., if the word contains an ‘O’, I’ll use zero. If it has an ‘E’, I’ll use the number three, and if there’s an ‘I’, I’ll substitute a one. Also, any letter in the word that falls on the top row of the qwerty keyboard, I will capitalize, thus making the password far harder to hack by any online robot. Visually it will look similar to the word I find easy to remember, but it’s far more secure against hackers. For instance, if one of my favourite authors is Farley Mowat, I might have a password that looks like faRl3Y. If my pet’s name is Luther, my password mght look like lUTh3r. It might.
Passwords are probably the most problematic issue for casual users. If I had a nickel for every time I asked a client for their computer, email, Skype, Apple ID or wifi password, only to be greeted with a blank stare, I’d be a wealthy man. As discussed in the last installment, the Keychain access utility on your Mac will remember your lesser passwords for you, and allow you to retrieve them if need be, but you will need to know your computer user password to access them.
You can get away with not having your Apple computer’s password for a short period of time, but any software updates or installs will require that you remember it eventually. Luckily you can change the user password by booting from your system disk, included in the box at purchase time. To do so, insert the disk, click restart and hold down the ‘C’ key until you see the grey screen and spinning gear. Once it’s up and running, there will be a list of utilities in a drop-down box. Choose ‘reset password’ and input a password that you will remember, according to some of the previous hints. If you’re running Lion or Mountain Lion, hold the Option key on startup and choose the Recovery HD icon. That will bring up a similar set of options.
When it comes to passwords, my suggestion is to use one or two straightforward passwords for inconsequential websites, like Facebook or Skype, and another one or two more secure passwords for more sensitive uses, such as email or online banking. And it wouldn’t kill you to write them down somewhere and store them somewhere not far away, because your main security threat is not the person who breaks into your home to steal your valuables, but some professional in an office in Russia, or his mom’s basement in Dakron, sniffing around for trouble.
Protect yourself with strong passwords.
First I learned it, then I used it, then I knew it.
How to create movie and screen recordings using QuickTime:
Manage iPhoto Duplicates with Duplicate Cleaner for iPhoto
This 3rd party application, available for free at your App store, actually works to locate and delete exact iPhoto duplicates. Free up a little disk space and trim down those annoying duplicates.
Create PDFs with the print function.
The easiest way to create a PDF (portable document format – the best format for sharing documents across multiple platforms), open your document in the application where you created it, (safari, pages, word, mail) click print, in the lower left corner of the dialogue box, open the ‘pdf’ drop-down box and choose ‘save as PDF’.
Merge multi-page PDFs with Preview.
Now that you’ve created your PDF with either the print function, or with your scanner, you can merge multiple one page documents into single documents with multiple pages. Use preview to open both documents, choose the View menu and select ‘show sidebar’. Drag the document’s icon from the sidebar directly over top of the second document’s icon and save the new multiple page document.
Email link from Safari
This one’s easy. When browsing in Safari, you can mail the contents of your page by going to your file menu and choosing ‘mail contents of this page.’ or ‘mail link to this page’.
Capitalize with Pages
You can transform your Pages documents to All Caps, Small Caps or none, using the Format > Font > Capitalization feature in the Format drop down menu.
 Email Webpage Link Or Contents
As with anything Apple, there’s always more than one way to skin a cat, or in this case, to email a Safari webpage to a friend. With the webpage open, go to your File menu and choose either the Mail Contents, or Mail Link To This Page. Advanced users might prefer to use the keyboard shortcuts. Alternately, you can customize your Safari Toolbar to show the email toolbar icon
Add Auto-Responder To Your Emails
You can add an auto-responder to your email, so that all incoming emails are automatically responded to with an instant and consistent message. This can be handy when on holiday, or for many other reasons. Go to your Preferences menu in your Mail program and navigate to the Rules panel. Choose ‘Add Rule’ and give your new rule a name. Select a parameter from the list (ie., sender in address book, subject includes, etc.) choose to reply to message and type in your chosen reply. Apply rule.
Delete Previous Recipients
Your email program will auto-fill the address of any recipient you may have emailed in the past. To edit or delete a previous recipient, navigate to the ‘window’ menu in your top menu bar, select ‘previous recipients’ and clean up any addresses you no longer wish to autofill.
 Change Email Signature on iPad / iPhone
Your emails don’t have to go out with the same old default signature ‘Sent from my iPhone’. To customize this line, go the settings icon on your IOS device home screen, choose ‘mail, contacts and calendars’ and navigate to the signatures tab. Swipe the arrow to the right and input the signature of your choice.
Add Find My iPhone
Every iPhone or iPad user should install and deploy this free app from the App store. Launch the app and sign in using your Apple ID. If you should ever misplace your iPhone, or have it stolen, you can login to iCloud from any other computer and find your device on a map. You can also play a sound on the iPhone to help you locate it, you can lock it and you can even erase it. Keep in mind that the power has to be on for this feature to work, a smarter thief may be able to power the device down to avoid detection.
Add Desktop Shortcut From Your Favourite Website And Change Icon
It’s easy to add a shortcut to your favourite website to your desktop, simply open the website in Safari, grab the favicon to the left of the website address in the toolbar, and drag it to your desktop. To change the icon, copy an image you’d like to replace it with, click the icon in your desktop, choose Get Info, and paste the new image onto the old one.
 Change Email Profile Picture
Your email goes out with your account profile picture in the top right corner. To change the picture displayed in your mail, go to your Address Book and find your User Card, indicated by the icon shown. Double click on the photo or image displayed, then click Choose to navigate to your iPhoto library and choose a new photo, or through your folders to find another image. You can also use the camera to take a photo using your iSight camera.
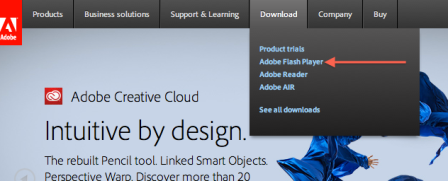 Lots of emails this week about the new Adobe Flash update and how to install it. They seem to update this plugin every 4 to 6 weeks, and it’s essential to many online services like YouTube videos and other sites.
First, go directly to the Adobe.com website and navigate to Downloads.
Select the Adobe Flash update and click to download.
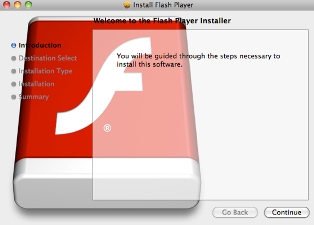 Now this is where most people get tripped up. After downloading the software, you still have to go through several steps to complete the install. Locate the update .dmg (disk mounted image) file in your downloads folder. Double click to launch the installer.
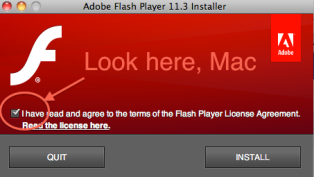 Choose the volume where you wish to install the software (your Macintosh HD) and follow the prompts the installer presents. It will require that you close any browsers, Safari, Firefox etc., before continuing.
You also have to agree to the software terms and conditions.
Once you’ve completed all of these steps, you should be good to go.

 These are your Mac’s System Preferences. They can do a lot. So, as an exercise, I’m going to go through each of them, one a day, and show you what they do. For starters, you can find them in your Apple menu, very top left of your screen.